Showing posts with label tricks and tips. Show all posts
5 Best Sites to Get Free Stock Photos for Graphic Designers
free resources
,
free sites
,
Graphic design
,
Graphic design trend
,
graphic design trends.
,
tricks and tips
,
Tutorials
Graphics and web designers always need the best image and photos for their design project. The web is full of awesome photos.

That being said you can not use any image of the web as they are copyright. They cannot be used unless you buy them. However, freelance designers have a budget. They cannot afford to buy high pice images if the project is of a low budget. Therefore there is always a need for sites that offer free image for commercial use. Luckily there are some good sites that offer good image free for commercial use.
People get attracted to images. We need images in our day to day life for our blog, social media, website and print projects. So we need images we can use without any legal issues of copyright. Images have licenses. There are various types of licenses. Images with a creative common license are the ones you should use in your projects. You can copy, distribute, and display the photo or image placed under a Creative Commons license providing the photo or image is correctly attributed to the owner. Please check the license of the image before you use it. There are some images which require a link back while others don't.
Here is the list,
1) Pixabay: Pixabay is one of the best sites to get copyright free stock images. There are many images which are of high quality.

The best part is you can get images of all quality ie high, medium or low. Vector images are however not so good. The site also provides free videos as well.
2) Pexels: This site has good quality images that you can use. There are tonnes of hi-quality images you can use.

3) Unsplash: This is the best site for free photos and images. They have images for all categories. Wide range of artists upload images every single day.

That being said you can not use any image of the web as they are copyright. They cannot be used unless you buy them. However, freelance designers have a budget. They cannot afford to buy high pice images if the project is of a low budget. Therefore there is always a need for sites that offer free image for commercial use. Luckily there are some good sites that offer good image free for commercial use.
People get attracted to images. We need images in our day to day life for our blog, social media, website and print projects. So we need images we can use without any legal issues of copyright. Images have licenses. There are various types of licenses. Images with a creative common license are the ones you should use in your projects. You can copy, distribute, and display the photo or image placed under a Creative Commons license providing the photo or image is correctly attributed to the owner. Please check the license of the image before you use it. There are some images which require a link back while others don't.
Here is the list,
1) Pixabay: Pixabay is one of the best sites to get copyright free stock images. There are many images which are of high quality.
The best part is you can get images of all quality ie high, medium or low. Vector images are however not so good. The site also provides free videos as well.
2) Pexels: This site has good quality images that you can use. There are tonnes of hi-quality images you can use.
3) Unsplash: This is the best site for free photos and images. They have images for all categories. Wide range of artists upload images every single day.
4) Gratisography: This is a cool site that has many humorous photos. You can use the photos in your commercial and personal projects. However, not all are free for commercial use so please check the license before use.

5) StockVault : the photos are of high-quality. You will get not just photos but also logo templates, web templates, clip arts, textures, and backgrounds. The quality of the images is awesome. However, not all are free for commercial use so please check the license before use.

These are my top 5 sites for free photos and images. Copyright of the image is a big thing and breaking it may lead to severe consequences. Please check the license for each and every photo that you use from these sites or any other site from the web. These were my picks let me know if you know any more awesome sites for free resources.
5) StockVault : the photos are of high-quality. You will get not just photos but also logo templates, web templates, clip arts, textures, and backgrounds. The quality of the images is awesome. However, not all are free for commercial use so please check the license before use.
These are my top 5 sites for free photos and images. Copyright of the image is a big thing and breaking it may lead to severe consequences. Please check the license for each and every photo that you use from these sites or any other site from the web. These were my picks let me know if you know any more awesome sites for free resources.
Practice and play around with the photos and 1 day you will be able to create awesome art with it in a professional manner and become a Really Creative Graphic Designer.
How To Make Dotted Lines In Illustrator In Just 2 Simple Steps
Dotted lines are widely used in design projects. They make the design more appealing. To make a dotted line is really easy in adobe Illustrator.

Don't just start making an ellipse and copy it along the path. There is a simple way to make it in just 2 simple steps.
So let's start,
1) Make an ellipse any size any stroke. I have made an ellipse with a stroke of 5pt. Stroke width is really important here. The larger the stroke width larger the dots will be.

2) Open Stroke Panel by going to window > stroke or simply press Ctrl + F10. Here we need to change some settings.
a) Change the width to appropriate size.
b) Change cap to Round cap.
c) Select Align dashes to corners and path ends adjusting length to fit. This is the second option right in line to where you check Dashed Line.
d) Check the Dashed line and input 0pt for first dash and 15pt in gap. The higher the amount that you will input in gap the larger will be gap in between 2 dots.
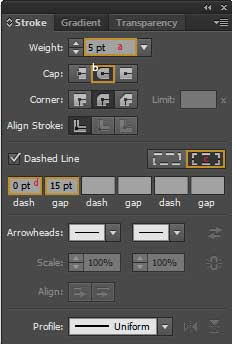
There you have it. Your dotted line in simply 2 steps.
You can use the same setting for any path that you want to be dotted.

The most interesting part comes here. This is a really useful tip for you. Make your dotted line just as I explained above and then change the stroke profile in the top bar get interesting effects.


Don't just start making an ellipse and copy it along the path. There is a simple way to make it in just 2 simple steps.
So let's start,
1) Make an ellipse any size any stroke. I have made an ellipse with a stroke of 5pt. Stroke width is really important here. The larger the stroke width larger the dots will be.
2) Open Stroke Panel by going to window > stroke or simply press Ctrl + F10. Here we need to change some settings.
a) Change the width to appropriate size.
b) Change cap to Round cap.
c) Select Align dashes to corners and path ends adjusting length to fit. This is the second option right in line to where you check Dashed Line.
d) Check the Dashed line and input 0pt for first dash and 15pt in gap. The higher the amount that you will input in gap the larger will be gap in between 2 dots.

There you have it. Your dotted line in simply 2 steps.
You can use the same setting for any path that you want to be dotted.

The most interesting part comes here. This is a really useful tip for you. Make your dotted line just as I explained above and then change the stroke profile in the top bar get interesting effects.


Practice and play around with the creating different types of dotted lines and 1 day you will be able to create awesome art with it in a professional manner and become a Really Creative Graphic Designer.
Don't forget to share your art with me and follow me on twitter and pintrest.
Don't forget to share your art with me and follow me on twitter and pintrest.
If you like my tutorials and posts follow me on twitter and pintrest
Top 5 Tricks of Adobe Illustrator CS6
In this post I am going to cover 5 tricks or tips of Adobe Illustrator CS6. There are many hidden features or should say unknown tricks in Adobe Illustrator CS6.


1) Transform Again: This is an awesome trick to create repeating patterns that are equally spaced. Create the object you want. Select the rotate tool alt click on the point around which you want to the object to be placed at an angle and click on copy. Then simply keep on pressing clt + D and the objects will keep getting duplicated.
Let’s see it with an example.
a) First create the 2 shapes as shown below.

b) Alt click on the center of orange circle.

c) Enter 24 in the field for angle and click on copy.

d) Keep pressing clt + D until you get the number of copies you want.

2) Shape Options: Shape tool have options which many are not aware of. When creating star or polygon if you want more point or less point, all you have to do is hold down up arrow key to add point or hold down arrow key to have less points.
Let’s see with an example.
Select the star shape tool and drag it to create the shape. While holding the mouse down press up arrow key to add more points. Now release the mouse and you have a star with more points. Repeat the step but this time press down key to get less points.

You can get the same result for polygon shape tool as well. Select the polygon shape tool and press down arrow key to have less point.

Similarly you can follow this exact same process with rounded rectangle tool to get more or less rounded corners. Select the rounded rectangle tool and hold down up arrow key to get a more rounded cornered rectangle.

3) Shape guides: when creating artwork you cannot always rely on the ruler guides. Many times you need guides which are actual shapes. Now with Adobe Illustrator CS6 you can easily make any shape your guide. Simple select the shape you want to make as a guide and press clt + 5. The shape turns into color of your guides. It won’t get exported to your final jpeg. It only guides you in your artwork.

4) Artboards: Adobe Illustrator CS6 now allows the use of multiple art boards. Many times we create artwork which requires multiple version. Now you can easily duplicate your artboard using the artboard tool. It duplicates your artboard with all the objects on it. Just press shift + O on the keyboard or select the artboard tool from the tools pallet (3rd last tool) and drag the art board while holding down alt. Now you have a new artboard and more space to work.

5) Outline Mode: This is mode which shows your artwork in outlines without any colors or effects. This mode helps you find your mistake easily such as an unclosed paths. Though in preview mode your art work may look perfect but many times there are unclosed paths that may cause problems in printing. Press Clt + Y to enter outline mode. It shows all paths in thin lines. In this example I have used shapes so I don't have any open paths. When you use pen, pencil or brush tool to create your artwork there are chances that some paths may remain open and unnoticed.

Experiment with and play with these tricks. Eventually you will become good at using these tricks which will simplify your work process and help your create artwork in a professional manner and become a Really Creative Graphic Designer.
Please don't forget to share your creations with me on Twitter and Pinterest.
If you like my tutorials and posts follow me on Twitter and Pinterest.
Healthy Tips : Health tips for computer users, Easy ways to stay fit while using computer
Healthy life
,
how to
,
T-shirts
,
tricks and tips
,
tshirt

We use computer all the time but we forget to do very important things while we are at it and thus harm our body. There are few things that everybody needs to follow at any cost. There are good habits while using computer lets see some of them. These are health tips for computer users. These are healthy habits before and after using the computer and while using it as well. After this you will not have the question how to prevent computer health problems.

Keep your spine Straight. Sit back on the chair touching the back of the chair.
Keep your head straight ie your eyes should look straight at the screen. Do not look up or down. adjust your screen in such a way that you can look at it straight on.
Keep your head straight ie your eyes should look straight at the screen. Do not look up or down. adjust your screen in such a way that you can look at it straight on.
Powered by Creative Market
Eye health tips for computer users :
- Keep blinking your eyes at regular intervals.
- Do not stare at the screen for long time.
- Wash your eyes with cold water at regular intervals.
- you can use a protective specs as well.
This is how to take care of your eyes from computer.
Move your head right and left at regular intervals. so your neck does not gets hurt. Also this will get your eyes away from screen for some time.
Take a walk go look at the sky after some hours of work.

Go cycling. If your office is close to your house why not take your cycle? Otherwise on weekends you can definitely go on cycling for at least half hour.
Do not listen to loud music on your headphones for long time.

Exercise daily if not full at least try to do warm up exercises like spot jogging, neck rotation, wrist rotation, looking left and right turning your head in that direction etc. each for five minute.
At last take proper diet. Eat lots of fruit and take lots of fruit drinks.
At last take proper diet. Eat lots of fruit and take lots of fruit drinks.
Learn meditation. Relax and try to be at peace for some time.
Lets get rid of the bad habits while using computer and get a healthy lifestyle.
Affiliate Disclaimer: This post contains affiliate links and I will be compensated if you make a purchase after clicking on my links. As an Amazon Associate and Fiverr affiliate, I earn from qualifying purchases. This will not cost you a single penny extra. Thanks for understanding and rewarding me for my hard work.
Practice and play around with these tutorials and 1 day you will be able to create awesome art with it in a professional manner and become a Really Creative Graphic Designer.
Don't forget to share your art with me and follow me on Twitter and Pinterest.
Don't forget to share your art with me and follow me on Twitter and Pinterest.
If you like my tutorials and posts follow me on Twitter and Pintrest
Subscribe to:
Posts
(
Atom
)