How To Make Dotted Lines In Illustrator In Just 2 Simple Steps
Dotted lines are widely used in design projects. They make the design more appealing. To make a dotted line is really easy in adobe Illustrator.

Don't just start making an ellipse and copy it along the path. There is a simple way to make it in just 2 simple steps.
So let's start,
1) Make an ellipse any size any stroke. I have made an ellipse with a stroke of 5pt. Stroke width is really important here. The larger the stroke width larger the dots will be.

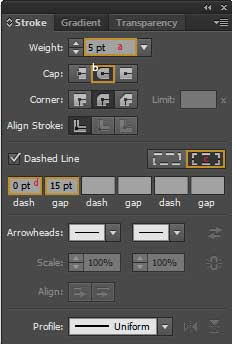
2) Open Stroke Panel by going to window > stroke or simply press Ctrl + F10. Here we need to change some settings.
a) Change the width to appropriate size.
b) Change cap to Round cap.
c) Select Align dashes to corners and path ends adjusting length to fit. This is the second option right in line to where you check Dashed Line.
d) Check the Dashed line and input 0pt for first dash and 15pt in gap. The higher the amount that you will input in gap the larger will be gap in between 2 dots.
There you have it. Your dotted line in simply 2 steps.
You can use the same setting for any path that you want to be dotted.

The most interesting part comes here. This is a really useful tip for you. Make your dotted line just as I explained above and then change the stroke profile in the top bar get interesting effects.


Don't just start making an ellipse and copy it along the path. There is a simple way to make it in just 2 simple steps.
So let's start,
1) Make an ellipse any size any stroke. I have made an ellipse with a stroke of 5pt. Stroke width is really important here. The larger the stroke width larger the dots will be.
2) Open Stroke Panel by going to window > stroke or simply press Ctrl + F10. Here we need to change some settings.
a) Change the width to appropriate size.
b) Change cap to Round cap.
c) Select Align dashes to corners and path ends adjusting length to fit. This is the second option right in line to where you check Dashed Line.
d) Check the Dashed line and input 0pt for first dash and 15pt in gap. The higher the amount that you will input in gap the larger will be gap in between 2 dots.

There you have it. Your dotted line in simply 2 steps.
You can use the same setting for any path that you want to be dotted.

The most interesting part comes here. This is a really useful tip for you. Make your dotted line just as I explained above and then change the stroke profile in the top bar get interesting effects.

Practice and play around with the creating different types of dotted lines and 1 day you will be able to create awesome art with it in a professional manner and become a Really Creative Graphic Designer.
Don't forget to share your art with me and follow me on twitter and pintrest.
Don't forget to share your art with me and follow me on twitter and pintrest.