Showing posts with label how to. Show all posts
How to create repeating pattern in Adobe Illustrator CS6
Abode Illustrator
,
how to
,
how to make repeating pattern
,
Illustrator
,
pattern
,
pattern design
,
seamless patter
,
Tutorials
Pattern designs are awesome. They make the perfect background for any design project. However, the process can be really intimidating. No not with Adobe Illustrator. let's see How to create a seamless pattern in Adobe Illustrator.
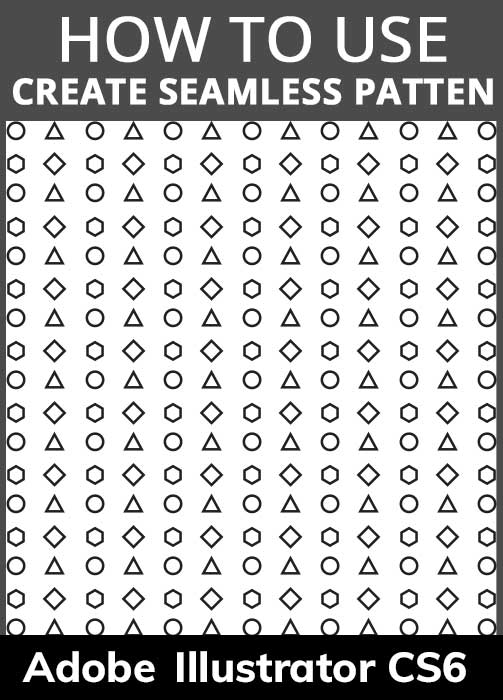


In this tutorial you will learn
- How to make pattern in Illustrator
- How to make a pattern swatch in illustrator
Let's get started and see how to create repeating pattern in adobe illustrator cs6 step by step,
1) Create the pattern that you want. For example, I created this.

2) Select all and drag it into the swatches panel. This will create a new swatch. You can now apply it to any shape or fill. I created this square and applied the new swatch as fill.


3) Now double click on the swatch that you just created. It will open the pattern in the artboard. Here now we will adjust the pattern.

a) First I will adjust and reposition the shapes as I like. Then in the patterns options, I have adjusted the width and height. For me, the width is 96 and the height is 76. Width adjusts the spacing between the pattern block horizontally and height vertically.

b) You have your pattern ready. Now you can have variations of it by changing how the pattern tiles. So by changing the tile type to brick by row you get a different pattern. Here the pattern tiles by row.

c) Then changing the tile type to brick by column you get a different pattern. Here the pattern tiles by column.
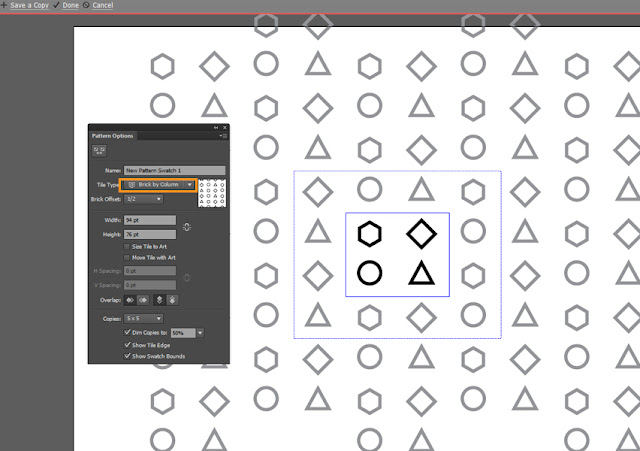


You have a repeating pattern as simple as that. Just in 2-3 steps, your seamless repeating pattern is ready. Creating a seamless pattern requires RND. you have to use the tile option in the pattern options to get the perfect pattern. So just play around with the setting and you will eventually get the perfect pattern.
Affiliate Disclaimer: This post contains affiliate links and I will be compensated if you make a purchase after clicking on my links. As an Amazon Associate and Envato elements associate, and creative market I earn from qualifying purchases. This will not cost you a single penny extra. Thanks for the understanding and for rewarding me for my hard work.

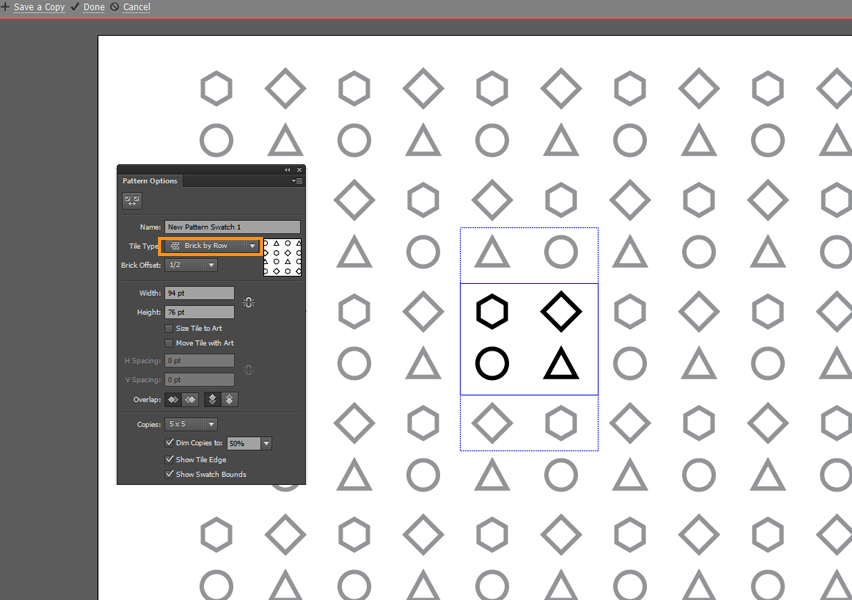

d) Adjust the width and height when you are happy with the pattern click on Done at the top of the window.

However, if you need readymade patterns do check out Envato and CreativeMarket as they have a huge collection that will fit your every design need.
Powered by Creative Market
Affiliate Disclaimer: This post contains affiliate links and I will be compensated if you make a purchase after clicking on my links. As an Amazon Associate and Envato elements associate, and creative market I earn from qualifying purchases. This will not cost you a single penny extra. Thanks for the understanding and for rewarding me for my hard work.
Practice and play around with these patterns and 1 day you will be able to create awesome art with it in a professional manner and become a Really Creative Graphic Designer.
how to make t shirt design without photoshop, Make an awesome t-shirt design in minutes using Placeit
Want to start a T-shirt business? or Do you already have a T-shirt business but need more awesome designs? Then check out this perfect website that will not only give you hundreds of designs that you can customize in seconds but also help you create final mockups. t shirt design online website that anyone can use easily. t shirt design maker website that has a design for every niche.

Photoshop is widely used to design t-shirts but by using this website you will know how to make t shirt design without photoshop!
So let’s get started,
First of all head over to Placeit.net and click on designs on the top menu bar and click on T-shirt designs or simply follow this link. You will get hundreds of designs instantly. Or simply follow this link

On the left side menu you can get many options to choose from:

First of all head over to Placeit.net and click on designs on the top menu bar and click on T-shirt designs or simply follow this link. You will get hundreds of designs instantly. Or simply follow this link
On the left side menu you can get many options to choose from:
You can choose to sort by bestselling, free, or new.

You can choose to see Food T-Shirts, Kids T-Shirts, Political T-Shirts, T-Shirt Design, Animals T-Shirts, Cause T-Shirts, Family T-Shirts, Feminist T-Shirt, and more.
Or you can directly sort by tags such as 4th July, 60, aliens, anime, and many more.

Or you can directly sort by tags such as 4th July, 60, aliens, anime, and many more.
So here I will select this design if you like this follow this link

You can change all the parameters of this image. Check out the right and left sidebars.
Firstly on the left side, you will find options to change the color and upload your design.

So I will change the Text to Nature is and select this orange-gold color. And I will also change the second text to Awesome. You can also upload a logo if you want to. Set the background to none from the right side menu for background color.


See how easy it is. Just in a minute, your T-shirt design is ready. Now you know how to make t shirt design online easily in minutes.
Now all you have to do is download it and make some awesome presentation with it to sell online. So you have 2 options you can either download this particular design for $2.99 only or you can buy placeit.net subscription for just $14.95 monthly/ $89.69 annual and get unlimited access Access to All Templates!

If you are a t-shirt seller I highly recommend you take up a Subscription so that you get access to unlimited designs.
You can change all the parameters of this image. Check out the right and left sidebars.
Firstly on the left side, you will find options to change the color and upload your design.

So I will change the Text to Nature is and select this orange-gold color. And I will also change the second text to Awesome. You can also upload a logo if you want to. Set the background to none from the right side menu for background color.
So the result is

Now all you have to do is download it and make some awesome presentation with it to sell online. So you have 2 options you can either download this particular design for $2.99 only or you can buy placeit.net subscription for just $14.95 monthly/ $89.69 annual and get unlimited access Access to All Templates!
If you are a t-shirt seller I highly recommend you take up a Subscription so that you get access to unlimited designs.
After you download the file you can easily make awesome mockups using placeit.net T-shirt mockups.
Please follow this tutorial to make awesome t-shirt mockups in minutes.
SUBSCRIBE NOW and get access to unlimited downloads.
As a treat, you will also find some free mockups that you can use for FREE :)Affiliate Disclaimer: This post contains affiliate links and I will be compensated if you make a purchase after clicking on my links. As an Amazon Associate and placeit.net associate, I earn from qualifying purchases. This will not cost you a single penny extra. Thanks for the understanding and rewarding me for my hard work.
Practice and play around with these designs and 1 day you will be able to create awesome art with it in a professional manner and become a Really Creative Graphic Designer.
If you like my tutorials and posts follow me on Twitter and Pinterest
How to get free Etsy listings!
Etsy is the best marketplace to sell online. It is a site that allows you to sell anything that you have made which distinguishes it from other sites.

Etsy Charges 0.20 per listing as listing charges. This is really low is you speak of one listing. But we have had many listing right. So eventually it becomes a fee that everyone despises. So Etsy has made a provision that if you refer someone to open an Etsy shop via your given Etsy link then you get 40 FREE listings how cool is that? Not just you but the person who opens a shop via your link also gets 40 FREE listings.
So where do you find this shareable link?
First Follow this link https://www.etsy.com/legal/policy/earn-free-listings/239323720100
then in How can I participate? In that paragraph, you will see go here underlined. Click on that underlined go here. See the image below if you are unable to find it.

Once you click on it you will be taken to an Etsy page where you will find Share your link now to start reaping the rewards link. Copy that link and share it on social media, your blogs, or just about anywhere and everywhere.

This is my link. Please open your Etsy Shop via this link if you found this useful. It will help me a lot to keep making such tutorials for you.
Remember to share the right link. If you have multiple shops be sure to share the link of the shop where you want free listings. If you use the wrong account then you cannot ask Etsy to transfer it to your other account as they don't do it.
Please don't forget to share a link to your shop with me on twitter.
Practice and play around with these tutorials and 1 day you will be able to create awesome art with it in a professional manner and become a Really Creative Graphic Designer.
Don't forget to share your art with me and follow me on Twitter and Pinterest.
If you like my tutorials and posts follow me on Twitter and Pinterest
Affiliate Disclaimer: This post contains affiliate links and I will be compensated if you make a purchase after clicking on my links. As an Amazon Associate, I earn from qualifying purchases. This will not cost you a single penny extra. Thanks for the understanding and rewarding me for my hard work.
Etsy Charges 0.20 per listing as listing charges. This is really low is you speak of one listing. But we have had many listing right. So eventually it becomes a fee that everyone despises. So Etsy has made a provision that if you refer someone to open an Etsy shop via your given Etsy link then you get 40 FREE listings how cool is that? Not just you but the person who opens a shop via your link also gets 40 FREE listings.
So where do you find this shareable link?
First Follow this link https://www.etsy.com/legal/policy/earn-free-listings/239323720100
then in How can I participate? In that paragraph, you will see go here underlined. Click on that underlined go here. See the image below if you are unable to find it.
Once you click on it you will be taken to an Etsy page where you will find Share your link now to start reaping the rewards link. Copy that link and share it on social media, your blogs, or just about anywhere and everywhere.
This is my link. Please open your Etsy Shop via this link if you found this useful. It will help me a lot to keep making such tutorials for you.
Remember to share the right link. If you have multiple shops be sure to share the link of the shop where you want free listings. If you use the wrong account then you cannot ask Etsy to transfer it to your other account as they don't do it.
Please don't forget to share a link to your shop with me on twitter.
Practice and play around with these tutorials and 1 day you will be able to create awesome art with it in a professional manner and become a Really Creative Graphic Designer.
Don't forget to share your art with me and follow me on Twitter and Pinterest.
If you like my tutorials and posts follow me on Twitter and Pinterest
Affiliate Disclaimer: This post contains affiliate links and I will be compensated if you make a purchase after clicking on my links. As an Amazon Associate, I earn from qualifying purchases. This will not cost you a single penny extra. Thanks for the understanding and rewarding me for my hard work.
50 digital products to sell on Esty 2022
earn money
,
earn money online
,
Etsy
,
Etsy shop
,
Etsy tips and tricks
,
Etsy tutorials
,
how to
,
Tutorials
Etsy is the best market place to earn passive income selling digital products. You can easily create digital products if you have experience in graphic design. However, even if you don't have any design knowledge there are many free software, apps, and programs you can use to create files with a click of the mouse. These are best digital products to sell on Esty 2022. Check out 50 most popular digital downloads that you can easily create and sell on Etsy.

2. wedding invitation
3. Printable wall art/home decor
4. Coloring book pages
5. Digital eBooks
Here is the list of digital products you can sell on Etsy :
1. Digital Art prints2. wedding invitation
3. Printable wall art/home decor
4. Coloring book pages
5. Digital eBooks

6. Printable planner pages
7. Invitation templates and announcements
8. Website design templates
9. Logo
10. Packaging labels
11. Business card templates
12. Resume templates
13. Digital greeting cards
14. Meal planning cards
15. Printable stickers
7. Invitation templates and announcements
8. Website design templates
9. Logo
10. Packaging labels
11. Business card templates
12. Resume templates
13. Digital greeting cards
14. Meal planning cards
15. Printable stickers

16. Flashcards
17. SVG graphics
18. Knitting patterns
19. Sewing patterns
20. Printable games
17. SVG graphics
18. Knitting patterns
19. Sewing patterns
20. Printable games

21. Digital courses
22. Stock Photos
23. Wellness planners and printables
24. Mandala coloring printable
25. Calendar printables
26. Bookmark printables
27. Etsy Banners
28. Printable candle labels
29. Gift tags
30. Birth announcement cards

31. Printable notepads
32. Mockups
33. Digital printed papers
34. Printable photo frames
35. Printable photo backdrops
36. Printable bridal shower posters
37. Budget Trackers/ Spreadsheets
38. Journals
39. Marketing Material Templates
40. Website Design Templates

41. Social Media Post Templates
42. Back to School Signs
43. Cover Letter Templates
44. Table Numbers
45. Food Labels
46. Fitness Trackers
47. Meal Planners
48. Etsy Planners
49. Etsy SEO course
50. Etsy course. How to sell on Etsy course

There are even more categories that you can explore apart from these 50 digital products! Remember these are just digital products there are countless other products also that you can sell on Etsy.
If you are planning to open an Etsy store I highly recommend you first go through my Don't Open an Etsy Shop before reading this. How to open an Etsy shop with a secret no one tells you blog post.
Open your Etsy shop via my link and get 40 FREE listings: Click here to open your Etsy Shop
If you are planning to open an Etsy store I highly recommend you first go through my Don't Open an Etsy Shop before reading this. How to open an Etsy shop with a secret no one tells you blog post.
Open your Etsy shop via my link and get 40 FREE listings: Click here to open your Etsy Shop
You can get resources for your digital products store from Creative Market. They have huge range of fonts, images, mockups, banners, template and much more. Check out CreativeMarket
Powered by Creative Market
Check out my other Etsy tutorial on my blog:
- How to open an Etsy shop
- How to get free Etsy listings!
- How to create mock ups for your digital art prints
You can create creative mockups for your Etsy products using Plceit.net Check out the above tutorials or click the link below
Please don't forget to share a link to your shop with me on Twitter
Practice and play around with these tutorials and 1 day you will be able to create awesome art with it in a professional manner and become a Really Creative Graphic Designer.
Don't forget to share your art with me and follow me on Twitter and Pinterest
If you like my tutorials and posts follow me on Twitter and Pintrest
Affiliate Disclaimer: This post contains affiliate links and I will be compensated if you make a purchase after clicking on my links. As an Associate, I earn from qualifying purchases. This will not cost you a single penny extra. Thanks for the understanding and rewarding me for my hard work.
Don't Open an Etsy Shop before reading this. How to open an Etsy shop with a secret no one tells you.
earn money
,
earn money online
,
Etsy
,
Etsy shop
,
Etsy tips and tricks
,
Etsy tutorials
,
how to
,
Tutorials
Etsy is the top site wherein you can sell handmade and digital products. It is really easy to make an account and start earning Now.

In this tutorial, I will show you how to set up your Etsy shop and start adding your listing. I highly recommend that you go through the entire tutorial and then go ahead and open your Etsy shop as there is a secret hidden in this tutorial. I made this mistake when I opened my Etsy shop so, don't you do it.
So, the very first thing you need to do is obviously open an account at Etsy.com.
Opening an account:
1) open Etsy.com and scroll down all the way down to the footer and click on Sell on Etsy.

In this tutorial, I will show you how to set up your Etsy shop and start adding your listing. I highly recommend that you go through the entire tutorial and then go ahead and open your Etsy shop as there is a secret hidden in this tutorial. I made this mistake when I opened my Etsy shop so, don't you do it.
So, the very first thing you need to do is obviously open an account at Etsy.com.
Opening an account:
1) open Etsy.com and scroll down all the way down to the footer and click on Sell on Etsy.

2) Click Open your Etsy shop.

Now you have 2 options to either sign up with your email or with your accounts such as
a) Continue with Google
b) Continue with Facebook
c) Continue with Apple
Select the option you want. and continue.
Now you have 2 options to either sign up with your email or with your accounts such as
a) Continue with Google
b) Continue with Facebook
c) Continue with Apple
Select the option you want. and continue.

3) Set your Shop Preferences :
a) Shop language: Select the language that you will be listing your items for sale. Remember that you won't be able to change it later so select it wisely.
b) Shop country: select the country that you want to sell your products.
c) Shop currency: Choose the currency that you want to sell your products in.
b) Shop country: select the country that you want to sell your products.
c) Shop currency: Choose the currency that you want to sell your products in.
d) Which best describes you: Select the option that fits you. If you are a full-time seller or a part-time seller or you can choose other.
Then click Save and continue.

And you have your Etsy shop open. Hooray :)
5) Stock up: Time to add in your items to sell. here you can add in any number of items you want to sell. However, I would recommend you do your research first. Find out what sells and what people like and buy. Then set your items.

The Secret comes here: When you list your items to sell on Etsy shop you get charged 0.20 for every listing. However, if you open your Etsy shop via someone's referral link then both of you get 40 free Etsy listing :) isn't that cool. So, here is my link https://etsy.me/386oYVm
please use it to open your Etsy shop so that both of use get 40 free Etsy listing.
Adding in your Listing: This involves quite a few steps that you must fill in carefully. This is where you enter all the details that will be visible on your sales page and where you set the price and delivery options of your items. All the fields are self-explanatory I will go through them in brief.

1) The first thing is the name of your listing. This is the most important part. Choose your name so that it includes all the keywords that your buyers will search for.
2)About the listing: Here you will give information about how the item was made if you made it or someone in your shop made it or was made by a different company. What is it a finished product or a tool to make the finished product. When it was made.
3) Category: Type in the category in which your item falls. For example, if you sell digital art prints you can type in digital download. then you will get more options to fill in such as the primary color, secondary color, occasion, holiday. these are optional and you can totally skip them.
4) Renewal options: Here you can set the renewal option to either automatic or manual. If you select automatic renewal it gets automatically renewed after 4 months or after the stock is over.
5) Type: Digital or physical. Here select the option that relates to you. If you are selling digital artwork select digital.
6) Description: Here give a complete description of your item. Give every single detail that your buyer must know. If you are selling Digital artwork make a clear statement that you are selling digital artwork and no physical item will be shipped. then you have section, material and tags those are optional as well.

Inventory and Pricing
7) Price: here you can set the price at which you want to sell your items for. Be honest. Don't set an unreasonable price. Do your research and see at what price others are selling.8) Quantity: Here you can set the quantity of the items that you want to sell.
9) SKU: This is Stock Keeping units. This is a number that helps you quickly identify your items and keep a track of your inventory.

Variations
10) variations: If you are providing multiple variations of your items you can provide it here. you can also set the price of each variation.
Personalization
11) Personalization: Turn this ON if you provide Personalization. The buyer provides you specific data they want in case of Personalization.
12) digital items: Add files here.
13) Shipping: Here you have to fill in shipping details. set your Shipping cost, origin zip code and processing time. There are many options you can set such as fixed shipping cost. Item weight, item size when packed is optional. You can also preview the shipping cost.
11) Personalization: Turn this ON if you provide Personalization. The buyer provides you specific data they want in case of Personalization.
12) digital items: Add files here.
13) Shipping: Here you have to fill in shipping details. set your Shipping cost, origin zip code and processing time. There are many options you can set such as fixed shipping cost. Item weight, item size when packed is optional. You can also preview the shipping cost.
Now click Save and continue. Finally, your listing is live and ready to be sold.
This is how simple and easy it is to open an Etsy shop. I hope you were able to find the secret and will take advantage of it.
You can use resources from CreativeMarket and Placeit to make your Etsy listing.

Affiliate Disclaimer: This post contains affiliate links and I will be compensated if you make a purchase after clicking on my links. As an Amazon Associate, I earn from qualifying purchases. This will not cost you a single penny extra. Thanks for understanding and rewarding me for my hard work.
Practice and play around with these tutorials and 1 day you will be able to create awesome art with it in a professional manner and become a Really Creative Graphic Designer.
Don't forget to share your art with me and follow me on Twitter and Pinterest
Don't forget to share your art with me and follow me on Twitter and Pinterest
If you like my tutorials and posts follow me on Twitter and Pintrest
How to create Pixel Stretch Effect In Photoshop
Abode Photoshop
,
Graphic design
,
Graphic design trend
,
graphic design trends.
,
Graphic design.
,
how to
,
Tutorials
Pixel Stretch Effect is an awesome effect you may have seen everywhere these days. But did you knew that it is really easy to make it in Photoshop?

Yes, you heard me right. It is really easy to make this effect in photoshop in a matter of few steps.
so, let's get started.
Yes, you heard me right. It is really easy to make this effect in photoshop in a matter of few steps.
so, let's get started.

Firstly you need an interesting photo. I have chosen this image.

This effect looks good on photos that have dynamic pose, for example, a ballerina, a dancer, sportsperson in action and many more.

Next, if your image has a background isolate the subject to a transparent background. You can easily isolate your subject using magic wand or pen tool.
Now comes the main part. You will find a number of ways to this but I have come with a new method that I have developed. follow these steps:
1) Duplicate the image 2 times. Let's name the top layer Main and bottom layer right. Hide the original image.

2) Now move the right layer to the right by holding Shift + right arrow 4 times. This will change according to your image but for my image 4 works just fine.
3) Select the Marquee tool and select the right image layer by Ctrl-clicking on the thumbnail of the right layer on the layer panel.

4) Press Ctrl + Alt-click on the thumbnail of the main layer. This will result in only the intersecting part of the image being selected. Now press Ctrl + Shift + C Followed by Ctrl + Shift + V. this will copy and paste it onto the new layer. Hide the Main and right layer.

5) Alt Click and drag it to right keep it overlapped. Make many such copies. I made 20 such copies! The point is to make a complete image from top to bottom. You may need more or fewer copies depending on your image.

6) Select the single column marquee tool and click on the image where it full from top to bottom. Now press Ctrl + Shift + C Followed by Ctrl + Shift + V. this will copy and paste it onto the new layer. Hide all the other copies.

7) You may not be able to see anything but there is :) Press Ctrl + T and stretch it to the right and there you have it pixel stretch effect.


6) Select the single column marquee tool and click on the image where it full from top to bottom. Now press Ctrl + Shift + C Followed by Ctrl + Shift + V. this will copy and paste it onto the new layer. Hide all the other copies.

7) You may not be able to see anything but there is :) Press Ctrl + T and stretch it to the right and there you have it pixel stretch effect.


8) Turn on the original layer ie unhide it. Move the pixel stretch behind it. Apply a layer mask and mask out the areas on the left of the image as well as the parts not required. Finally, you have the Final result.

There are many variations to this effect. It all is about your creativity. This is how simple it is to create Pixel stretch effect in photoshop.


In this course, you'll learn everything you need to know about getting started with Photoshop. This course is for beginners, without any required knowledge of Photoshop, photography, or design. It starts from the very beginning and works its way up, step by step. Whether you have never opened Photoshop before or you would like to review the basics, take this course to learn how to make beautiful images using Photoshop.
Buy Now

How to Get the Perfect Color in Photoshop


There are many variations to this effect. It all is about your creativity. This is how simple it is to create Pixel stretch effect in photoshop.

Practice and play around with this effect and 1 day you will be able to create awesome art with it in a professional manner and become a Really Creative Graphic Designer.
If you like my tutorials and posts follow me on Twitter and Pinterest
Want to learn Adobe Photoshop from the masters?
Check out these courses:
Adobe Photoshop Fundamentals
Buy Now
Adobe Photoshop Mastery
In this course, you'll learn advanced Photoshop techniques so you can be the best Photoshop professional possible! This course is for individuals with some experience in Photoshop, who already know the fundamentals. It's for those who have their own ways of doing things but believe there really is a better and faster way to work with Photoshop.
How to Get the Perfect Color in Photoshop
This course is about how to get perfect colors for your photos and images in photoshop by Aaron Nace.
Aaron Nace: A world-leading Photoshop educator with over 1.5 million subscribers on YouTube.
BUY NOW
Check out other Courses at Fiverr See all the courses

Affiliate Disclaimer: This post contains affiliate links and I will be compensated if you make a purchase after clicking on my links. As an Amazon Associate and Fiverr affiliate, I earn from qualifying purchases. This will not cost you a single penny extra. Thanks for the understanding and rewarding me for my hard work.
Check out other Courses at Fiverr See all the courses
Affiliate Disclaimer: This post contains affiliate links and I will be compensated if you make a purchase after clicking on my links. As an Amazon Associate and Fiverr affiliate, I earn from qualifying purchases. This will not cost you a single penny extra. Thanks for the understanding and rewarding me for my hard work.
Subscribe to:
Posts
(
Atom
)